What Light Spectrum Is Best for Microgreens?
A balanced white or full-spectrum light is best for microgreens. Blue light supports compact early growth, while some red light supports photosynthesis as seedlings develop.
On this page (9 sections)
- What Light Spectrum Is Best for Microgreens?
- What does light spectrum mean for microgreens?
- Is full-spectrum light best for microgreens?
- Should microgreens use blue light or red light?
- How can you check whether the light reaches the tray?
- What should you look for in a microgreens grow light?
- Can a reptile UVB hood grow microgreens?
- How do you set the best spectrum for microgreens?
- What is the best light spectrum for microgreens?
What Light Spectrum Is Best for Microgreens?
A balanced white or full-spectrum light is best for microgreens. Blue light can help young plants stay compact, while red light supports photosynthesis as the seedlings develop.
Microgreens grow quickly, so you do not need a complex lighting system for most trays at home. A simple fixture is often enough when it covers the tray evenly from the start.
Choose a source that spreads light evenly across every corner of the tray. Even spread helps young shoots grow at a similar rate without one side rushing ahead of the other.
A good light also helps keep the crop from stretching toward a weak source. Compact growth usually looks stronger and is easier to harvest cleanly in a small tray.
Clear, natural looking light lets you inspect leaf color without guessing under a heavy tint. You can spot pale leaves, uneven growth or early stress much sooner in white light.
Spectrum is only one part of the decision when you set up a tray. Light intensity, distance, coverage, heat and the number of hours each day also affect how a tray grows.
A close light may be bright but leave edges in shade if the fixture is narrow. A higher light may cover more area yet feel too weak for seedlings that need steady light.
Heat matters too, especially in a small shelf or cupboard where air may not move well. Warm leaves can dry out or stress young plants even when the color looks right.
Daily hours shape the whole crop because microgreens develop in a short window. A steady routine helps the tray respond in a predictable way from sowing to harvest.
For most beginners, balance beats special colors during this short cycle. Start with white or full spectrum light, then fix coverage and distance before you change anything else.
What does light spectrum mean for microgreens?
Light spectrum describes the range of visible wavelengths a lamp produces. For microgreens, the useful comparison is usually between blue, red, white or full-spectrum light.
Blue wavelengths are linked with compact vegetative growth. A source with enough blue light may help reduce the tall, thin shape that appears when seedlings are reaching for light.
Red wavelengths also support photosynthesis and can be useful as plants build leaves. A red-only source can make it harder to judge the plant's color, so it is often less convenient for a small indoor growing area.
White light combines visible wavelengths and gives you a more natural view of the crop. Full-spectrum products are designed to cover a broader range, but the label alone does not tell you how evenly or strongly the light reaches every part of the tray.
For a wider comparison of fixture types, see our guide to Best Grow Lights For Vegetables. Microgreens have a short crop cycle, so simple coverage often matters more than advanced controls.
Is full-spectrum light best for microgreens?
Full-spectrum light is a strong general choice when you want one light for the whole crop. It gives seedlings a broad visible range and makes it easier to inspect growth without switching lamps.
Full-spectrum does not automatically mean the light is strong enough for a tray. Check the area the fixture can cover, its distance from the plants and whether the edges of the tray receive similar light to the center.
A daylight-white lamp can also suit microgreens. The SunBlaster below is a 6400K full-spectrum fluorescent fixture with a 4 ft length and 3,730 lumens, so it fits growers who need broad coverage across a longer growing area.
Its 54-watt T5 high-output design is 49.5 in long and 3.5 in wide. The fixture includes a power cord, jumper plug, hanging clips and flat-surface mounting clips.
SunBlaster says its NanoTech reflector captures previously lost light and allows fixtures to sit 6–8 in above the canopy. Up to 8 units can be connected from one power cord, which may help when one fixture does not cover all your trays.
The trade-off is size. A 4 ft fixture can cover a broad row, but it may be awkward for one small tray or a narrow shelf.
For more full-spectrum options, compare our Best Full Spectrum Grow Light guide and read What Is a Full Spectrum Grow Light? for the basic terms.
Should microgreens use blue light or red light?
Use a balanced source instead of choosing blue or red alone unless you have a specific reason. Blue-heavy light can support compact growth, while red light contributes to photosynthesis, but a single-color lamp is less flexible for everyday growing.
Blue light may be useful when seedlings are stretching toward the lamp. Stretching can also mean the light is too far away, too weak for the coverage area or used for too few hours, so changing spectrum is not always the first fix.
Red light can support leaf production, but a red-heavy setup may make it harder to see pale, yellow or stressed plants. White or full-spectrum light gives you a more practical view while the crop is developing.
Microgreens are harvested young, so you usually don't need to manage separate vegetative and flowering stages. Choose a spectrum that gives even coverage and fits the tray dimensions.
For a comparison focused on spectrum choices across edible plants, see best grow light spectrum for vegetables.
How can you check whether the light reaches the tray?
Measure light across the whole canopy, not only at the center. The edges can receive much less light when a fixture is narrow, mounted too high or placed off-center.
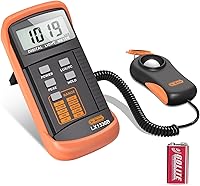
The Dr.meter measures illuminance from 0 to 200,000 lux and can display readings in lux or foot-candles. That makes it useful for comparing the center, corners and edges of a tray during setup.
The meter gives readings twice per second and can hold the highest pulse value with its PEAK function. It runs on one included 9V zinc-carbon battery and has a low-battery alert.
Use it as a comparison tool rather than treating one number as a universal microgreens target. Take readings at the canopy height, move the sensor across the tray and adjust the fixture until the spread is more even.
The trade-off is that a meter measures illuminance, not every detail of a grow light's spectrum. It can show whether one area is brighter than another, but it cannot by itself prove that a lamp has the ideal wavelength mix.
What should you look for in a microgreens grow light?
Look for even coverage, a suitable distance and manageable heat before adding advanced spectrum controls. A good light should cover the entire tray without leaving the edges noticeably darker.
Check these points before setting up:
- Match the fixture length and beam spread to the tray or shelf.
- Keep the light close enough for useful intensity, while watching for heat.
- Choose white or full-spectrum light if you want to inspect plant color easily.
- Use a timer or consistent routine so the daily light period does not change often.
- Leave enough space to water without splashing the fixture.
- Measure several points across the canopy if growth looks uneven.
Coverage is the first practical test for any fixture you bring to a tray. Hold the light where you plan to mount it and look for dark corners that might lag behind the center.
Distance changes intensity quickly, so a small move can make a real difference over a few days. Start with the maker guidance when it is available, then watch the seedlings for their response.
Heat needs the same close attention, especially with fixtures placed low over tender leaves. If the canopy feels warm or the medium dries fast, raise the light or improve air flow around the shelf.
A timer helps you keep the daily period steady without relying on memory. Steady hours make growth easier to judge and reduce the chance of one bright day followed by a long dull spell.
Leave room to water from above or below without wetting the lamp or its cord. Water on a hot surface or near electrics is a risk you can avoid with a little extra space.
Measuring several points across the canopy can show problems that your eyes miss at a glance. A center reading may look fine while the corners are much dimmer and growing more slowly.
A narrow fixture may work well over one small tray but leave multiple trays underlit. A longer fixture can cover more surface area, though it may use more power and need a stronger mounting point.
Think about who the setup suits before you buy for a shelf or bench. A single tray on a windowsill table needs less reach than a row of trays on a rack.
The Best Grow Lights For Microgreens guide is the closest comparison if you are choosing a complete fixture rather than studying spectrum alone.
Can a reptile UVB hood grow microgreens?
A reptile UVB hood is not the first choice for microgreens. Its intended use is reptile lighting, and the presence of visible light does not make it a direct replacement for a plant-focused fixture.
The Zoo Med hood is a 14 in T5-HO terrarium hood with a ReptiSun T5 HO 5.0 UVB lamp. It has a low-profile design, an electronic ballast and a curved polished reflector.
The package includes the ReptiSun T5 HO 5.0 UVB lamp. Zoo Med describes the lamp for UVB, UVA and visible light for reptiles, including use with a Zoo Med ReptiSun T5 HO lamp.
That purpose creates a clear trade-off for plant growers who want simple crop light. The 14 in length may suit a very small enclosure, but UVB is not needed for a basic microgreens setup, and the product is designed around reptile care rather than crop coverage.
The hood has a low profile design that sits neatly on top of a small terrarium. That shape can be helpful where shelf height is tight, yet a low hood may still leave tray edges outside its useful spread.
An energy efficient T5 HO electronic ballast is part of the package for reptile use. Rapid start and steady output matter for animal lighting, but they do not turn the hood into a plant fixture with proven crop coverage.
A highly polished curved reflector helps spread light across the enclosure below. For microgreens, you would still need to check whether that spread is even enough over a flat tray at canopy height.
Extended UVB penetration at greater distances is a selling point for taller reptile enclosures. Microgreens grow low and close to the surface, so that kind of reach is less relevant to a shallow tray.
Most reptiles and birds can use UVB to make vitamin D3 for calcium use, which explains the design focus. Microgreens do not need that process, and extra UV should not be added without a clear and well researched reason.
The visible light in the package may make seedlings grow, but visible light alone is not the full test. You also need suitable intensity, even coverage, safe heat and a fixture shape that fits your tray.
If you already own the hood for a reptile enclosure, keep the uses separate for safety and care. A plant tray under a reptile lamp can confuse routines for both the crop and the animal, and cords or heat may not suit a damp growing area.
If you grow larger edible plants later, compare the coverage needs in Best Grow Lights For Tomatoes.
How do you set the best spectrum for microgreens?
Start with a white or full-spectrum light placed evenly over the tray, then adjust distance and coverage before changing to a different color mix. This gives you a practical baseline for most short-cycle crops.
Center the fixture over the tray so each side gets a fair share of light. If the lamp sits to one side, plants on the far edge may stretch while the near side grows too fast.
Watch the plants for signs that the setup needs adjustment during the first days. Tall, thin stems can point to insufficient light or excessive distance, while pale or bleached leaves can signal too much intensity or heat.
Make small changes and give the tray time to respond before you move the light again. Frequent large shifts can keep seedlings guessing and make it hard to learn what helped.
Keep the crop at a consistent height as it grows from sowing to harvest. A tray that begins close to the lamp can move nearer to the light as the plants develop, changing the intensity across the canopy.
That rising canopy matters because leaves get closer to the source even if you never touch the fixture. Check the gap each day, especially after a growth spurt or a change in tray position.
Use a light meter to compare positions when the tray looks uneven from one side to the other. The best reading is not necessarily the highest reading, because a slightly lower but even level can produce a more consistent crop from edge to edge.
Take readings at canopy height rather than at the lamp or the shelf surface. The plants respond to light where the leaves sit, so that level gives a more honest picture of daily conditions.
Adjust the fixture height or shift it a few centimeters at a time until the spread looks steadier. Record what you changed so you can repeat the setup for the next tray with the same crop.
Avoid placing water where it can splash onto the fixture during watering or misting. Keep the growing area clean, inspect cords before use and follow the instructions for the specific lamp.
Wipe dust from the fixture and shelf as needed, since a dirty cover can dull the light over time. A clean setup also makes it easier to see early signs of stress or uneven growth.
Keep people and pets clear of UV sources and follow the lamp maker guidance on exposure. Microgreens do best with balanced visible light, even coverage and a steady daily routine.
What is the best light spectrum for microgreens?
Choose a balanced white or full-spectrum source for most microgreens, then solve coverage and distance before chasing a special wavelength. Blue-heavy light may help compact growth, while red light supports photosynthesis, but a balanced source is easier to manage and inspect.
Use that order for every new tray and you will avoid most early problems. Coverage first means the edges keep pace with the center from the first day.
Distance comes next because it shapes intensity and heat at the leaf surface. A light that is too far can leave seedlings reaching, while a light that is too close can stress them.
Choose the SunBlaster if you need a long 6400K fixture for broad indoor coverage. Its 4 ft length suits a row of trays better than a single small tray on a narrow shelf.
Choose the Dr.meter if you need to compare light levels across a tray. Readings in lux or foot-candles help you check the center, corners and edges at canopy height.
Treat the Zoo Med hood as a reptile-lighting product, not a default plant grow light. UVB, UVA and visible light for reptiles serve a different purpose from balanced crop lighting.
For a simple home setup, white or full spectrum light, even spread and steady hours are enough for most trays. Keep the routine consistent and adjust based on how the seedlings actually grow.
Frequently asked questions
What light spectrum is best for microgreens?
A balanced white or full-spectrum light is the best general choice for microgreens because it supports compact seedling growth while giving you a clear view of leaf color. Blue-heavy light can help keep young plants compact, while red light supports photosynthesis as the crop develops.
Are blue or red lights better for microgreens?
Blue and red light serve different roles, so neither is the only best choice for every tray. Blue-heavy light can encourage compact growth, while red wavelengths support photosynthesis.
A balanced white or full-spectrum source is easier for most home growers to use.
Is 6400K good for growing microgreens?
A 6400K daylight source can work well for microgreens, especially during the short growing period from seedling to harvest. Color temperature is not the same as a complete spectrum, so also check the light's stated spectrum, coverage and distance from the canopy.
How far should a grow light be from microgreens?
The correct distance depends on the light's output, spread and heat. Use the maker's guidance when available, keep the light evenly over the tray, and watch the plants for stretching, bleaching or heat stress.
A light meter can help you compare readings across the canopy.
Do microgreens need UV light?
Microgreens generally don't need a UV source for a basic indoor growing setup. Avoid adding UV unless you have a specific, well-researched reason, because extra ultraviolet exposure can harm plants and people.
Focus first on balanced visible light, even coverage and a steady schedule.